Machine learning with Amazon Recognition and Elasticsearch
In this post we are going to see how to build a machine learning system to perform the image recognition task and use Elasticsearch as search engine to search for the labels identified within the images. The image recognition task is the process of identifying and detecting an object or a feature in a digital image or video.
The components that we will use are the following:
- Elasticsearch
- Kibana
- Skedler Reports and Alerts
- Amazon S3 bucket
- Amazon Simple Queue Service (eventually you can replace this with AWS Lambda)
- Amazon Rekognition
The idea is to build a system that will process the image recognition task against some images stored in a S3 bucket and will index the results (set of labels and % of confidence) to Elasticsearch. So we are going to use Elasticsearch as search engine for the labels found in the images.
If you are not familiar with one or more on the item listed before, I suggest you to read more about them here:
- Elasticsearch
- Kibana
- Skedler
- Alerts
- What is Amazon S3?
- Amazon Simple Queue Service
- Amazon Rekognition
Amazon Rekognition is a service that makes it easy to add image analysis to your applications. With Rekognition, you can detect objects, scenes, faces; recognize celebrities; and identify inappropriate content in images.
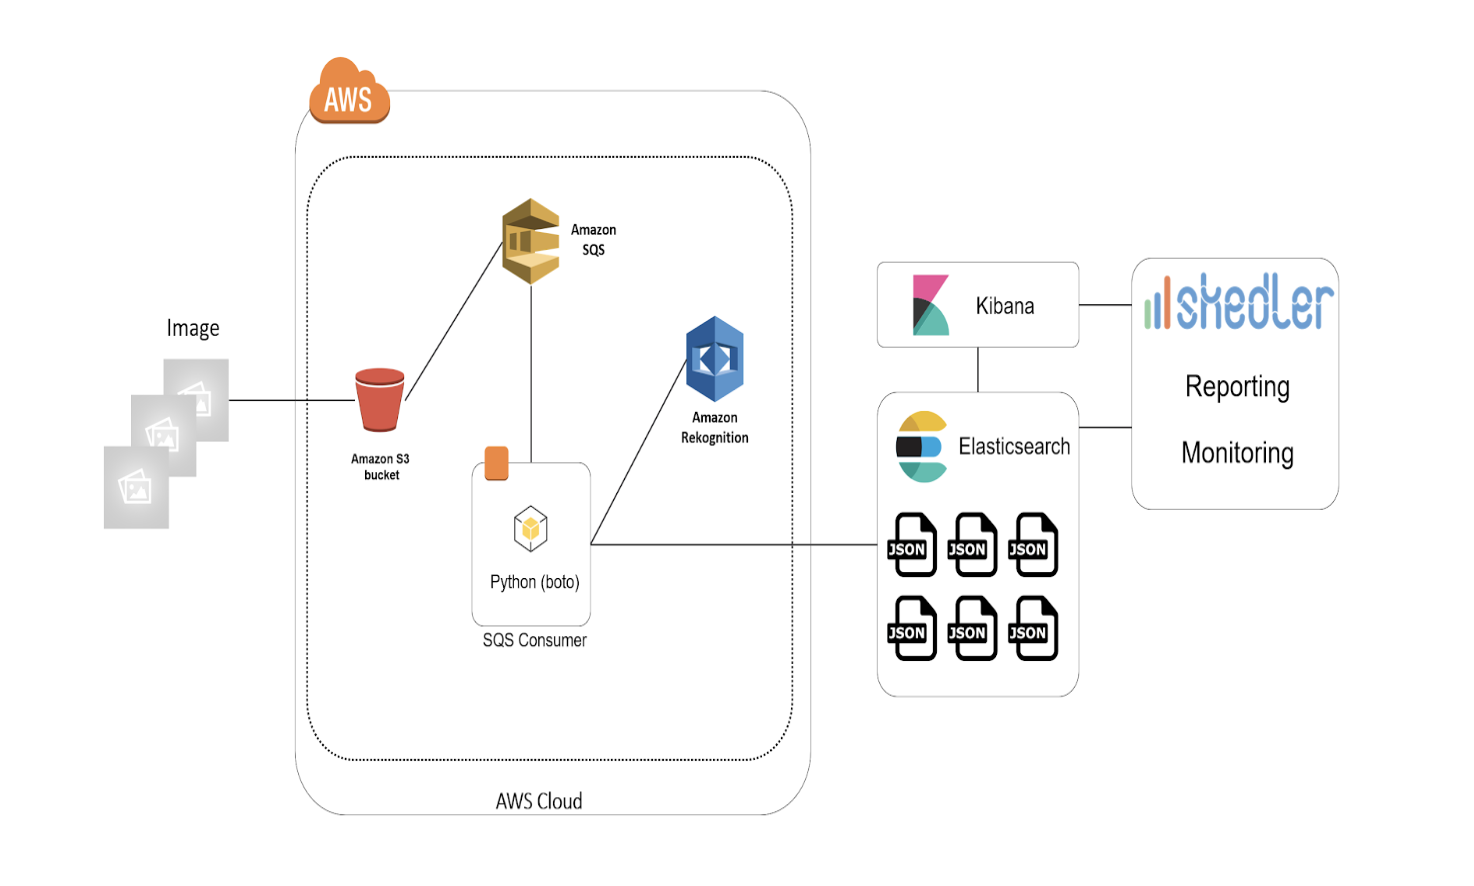
These are the main steps performed in the process:
- Upload an image to S3 bucket
- Event notification from S3 to an SQS queue
- Event consumed by a consumer
- Image recognition on the image using AWS Rekognition
- The result of the labels detection is indexed in Elasticsearch
- Search in Elasticsearch by labels
- Get the results from Elasticsearch and get the images from S3
- Use Kibana for dashboard and search
- Use Skedler and Alerts for reporting, monitoring and alerting
Architecture:
Use Case
This system architecture can be useful when you need to detect the labels in a picture and perform fast searches.
Example of applications:
- Smart photo gallery: find things in your photo. Detect labels in an automatic way and use Elasticsearch to search them
- Product Catalog: automatically classify the products of a catalog. Take photos of a product and get it classified
- Content moderation: get notified when a NSFW content is uploaded
- Accessibility camera app: help people with disability to see and take pictures
Event notification
When an image is uploaded to the S3 bucket a message will be stored to a Amazon SQS queue. You can read more information on how to configure the S3 Bucket and to read the queue programmatically here: Configuring Amazon S3 Event Notifications.
This is how a message notified from S3 looks like (we need the bucket and key information):
{“Records”:
[{
“eventSource”:”aws:s3″,
“awsRegion”:”your_aws_region”,
“eventTime”:”2017-11-16T12:47:48.435Z”,
“eventName”:”ObjectCreated:Put”,
“s3”:{
“configurationId”:”myS3EventCOnfiguration”,
“bucket”:{
“name”:”yourBucket”,
“arn”:”arn:aws:s3:::yourBucket”
},
“object”:{
“key”:”myImage.jpg”,
“eTag”:”790xxxxxe255kkkk011ayyyy908″
}
}
}]
}
Consume messages from the Amazon SQS queue
Now that the S3 bucket is configured, when an image is uploaded to the bucket an event will be notified and a message saved the SQS queue. We are going to build a consumer that will read this message and perform the image labels detection using AWS Rekognition. You can eventually read a set of messages (change the MaxNumberOfMessages parameter) from the queue and run the task against a set of images (batch processing) or use a AWS Lambda notification (instead of SQS).
With this code you can read the messages from a SQS queue and fetch the bucket and key (used in S3) of the uploaded file and use them to invoke AWS Rekognition for the labels detection task:
import boto3 as boto3
import time
import json
import os
AWS_ACCESS_KEY = ‘youAWS_ACCES_KEY’
AWS_SECRET_ACCESS_KEY = ‘youAWS_SECRET_ACCESKEY’
AWS_REGION = ‘yourAWS_SUBSCRIBTION_REGION’
SQS_QUEUE_NAME = ‘SQS_QUEUE_NAME’
BUCKET_NAME = ‘S3_BUCKET_NAME’
sqs_resource_connection = boto3.resource(
‘sqs’,
aws_access_key_id = AWS_ACCESS_KEY,
aws_secret_access_key = AWS_SECRET_ACCESS_KEY,
region_name = AWS_REGION
)
queue = sqs_resource_connection.get_queue_by_name(QueueName = SQS_QUEUE_NAME)
while True:
messages = queue.receive_messages(MaxNumberOfMessages = 1, WaitTimeSeconds = 5)
for message in messages:
body = json.loads(message.body)
filename_key = body[‘Records’][0][‘s3’][‘object’][‘key’]
# Here we will run the image labels detection with AWS Rekognition (we will need the Bucket name and file key)
# and index the labels detection result to Elasticsearch
# invoke_aws_reko(BUCKET_NAME, filename_key)
message.delete()
time.sleep(10)
Image recognition task
Now that we have the key of the uploaded image we can use AWS Rekognition to run the image recognition task.
The following function invoke the detect_labels method to get the labels of the image. It returns a dictionary with the identified labels and % of confidence.
import boto3
AWS_ACCESS_KEY = ‘youAWS_ACCES_KEY’
AWS_SECRET_ACCESS_KEY = ‘youAWS_SECRET_ACCESKEY’
AWS_REGION = ‘yourAWS_SUBSCRIBTION_REGION’
rekognition_client_connection = boto3.client(
‘rekognition’,
aws_access_key_id = AWS_ACCESS_KEY,
aws_secret_access_key = AWS_SECRET_ACCESS_KEY,
region_name = AWS_REGION
)
def invoke_aws_reko(bucket_name, filename_key):
result_dictionary = {}
reko_response = rekognition_client_connection.detect_labels(Image={
‘S3Object’: {
‘Bucket’: bucket_name,
‘Name’: filename_key,
}
})
if ‘Labels’ in reko_response and len(reko_response[‘Labels’])>0:
res = reko_response[‘Labels’]
for item in res:
print(‘{} : {}’.format(item[‘Name’], item[‘Confidence’]))
result_dictionary [item[‘Name’]] = item[‘Confidence’]
# We will index these information to Elasticsearch
return result_dictionary
Index to Elasticsearch
So given an image we have now a set of labels that identify it. We want now to index these labels to Elasticsearch. To do so, I created a new index called imagerepository and a new type called image.
The image type we are going to create will have the following properties:
- title: the title of the image
- s3_location: the link to the S3 resource
- labels: field that will contain the result of the detection task
For the labels property I used the Nested datatype. It allows arrays of objects to be indexed and queried independently of each other.
You can read more about it here:
We will not store the image in Elasticsearch but just the URL of the image within the S3 bucket.
New Index:
curl -XPUT ‘esHost:9200/imagerepository/’ -d ‘{
“settings” : {
“index” : {
“number_of_shards” : 1,
“number_of_replicas” : 0
}
}
}’
New type:
curl -X PUT “esHost:9200/imagerepository/image/_mapping” -d ‘{
“image” : {
“properties” : {
“title” : { “type” : “string” },
“s3_location” : { “type” : “string” },
“labels” : {
“type” : “nested”
}
}
}
}’
You can now try to post a dummy document:
curl -XPOST ‘esHost:9200/imagerepository/image/’ -d’
{
“title” : “test”,
“s3_location” : “http://mybucket/test.jpg”,
“labels” : [
{“label”: “test_tag1”,
“confidence”: 0.5},
{“label”: “test_tag2”,
“confidence”: 0.38},
{“label”: “test_tag3”,
“confidence”: 0.12}
]
}’
We can index a new document using the Elasitcsearch Python SDK.
from elasticsearch import Elasticsearch
es = Elasticsearch()
# dictionary with the result (labels and scores) – output of the invoke_aws_reko function invocation
result_dictionary = {}
result_dictionary[‘label_1’] = 0.3
result_dictionary[‘label_2’] = 0.5
result_dictionary[‘label_3’] = 0.2
img_s3_location = “https://yourbucket/dummy_picture.jpg”
img_title = “dummy_picture.jpg”
def index_new_document(img_title, img_s3_location, result_dictionary):
result_nested_obj = []
for key, value in result_dictionary.items():
result_nested_obj.append({“tag”:key, “score”:value})
doc = {
“title” : img_title,
“s3_location” : img_s3_location,
“labels” : result_nested_obj
}
# es is instance of Elasticsearch
res = es.index(index=’imagerepository’, doc_type=’image’, body=doc)
# Call the function
index_new_document(img_title, img_s3_location, result_dictionary)
Search
Now that we indexed our documents in Elasticsearch we can search for them.
This is an example of queries we can run:
- Give me all the images that represent this object (searching by label= object_name)
- What does this image (give the title) represent?
- Give me all the images that represent this object with at least 90% of probability (search by label= object_name and confidence>= 0.9)
I wrote some Sense queries.
Images that represent a waterfall:
post imagerepository/_search
{
“query”: {
“nested”: {
“path”: “labels”,
“query”: {
“bool”: {
“must”: [
{
“match”: {
“labels.label”: “waterfall”
}
}
]
}
}
}
}
}
Images that represent a pizza with at least 90% of probability:
post imagerepository/_search
{
“query”: {
“nested”: {
“path”: “labels”,
“query”: {
“bool”: {
“must”: [
{
“match”: {
“labels.label”: “pizza”
}
},
{
“range”: {
“labels.confidence”:{
“gte”: 0.90
}
}
}
]
}
}
}
}
}
Visualize and monitor
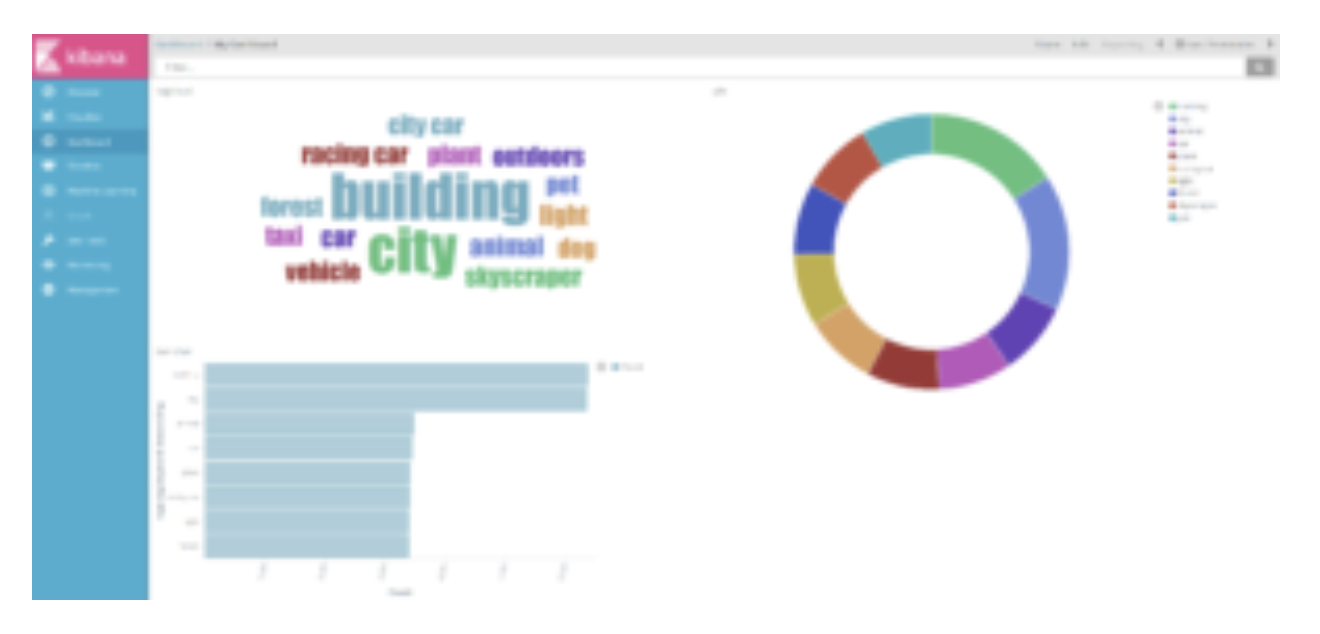
With Kibana you can create set of visualizations/dashboards to search for images by label and to monitor index metrics (like number of pictures by label, most common labels and so on).
Using Skedler, an easy to use report scheduling and distribution application for Elasticsearch-Kibana-Grafana, you can centrally schedule and distribute custom reports from Kibana Dashboards and Saved Searches as hourly/daily/weekly/monthly PDF, XLS or PNG reports to various stakeholders. If you want to read more about it: Skedler Review.
With Kibana you can create a dashboard to visualize the number of labels. Here you can see and example with bar/pie chart and tag cloud visualization (you can easily schedule and distribute the dashboard with Skedler).
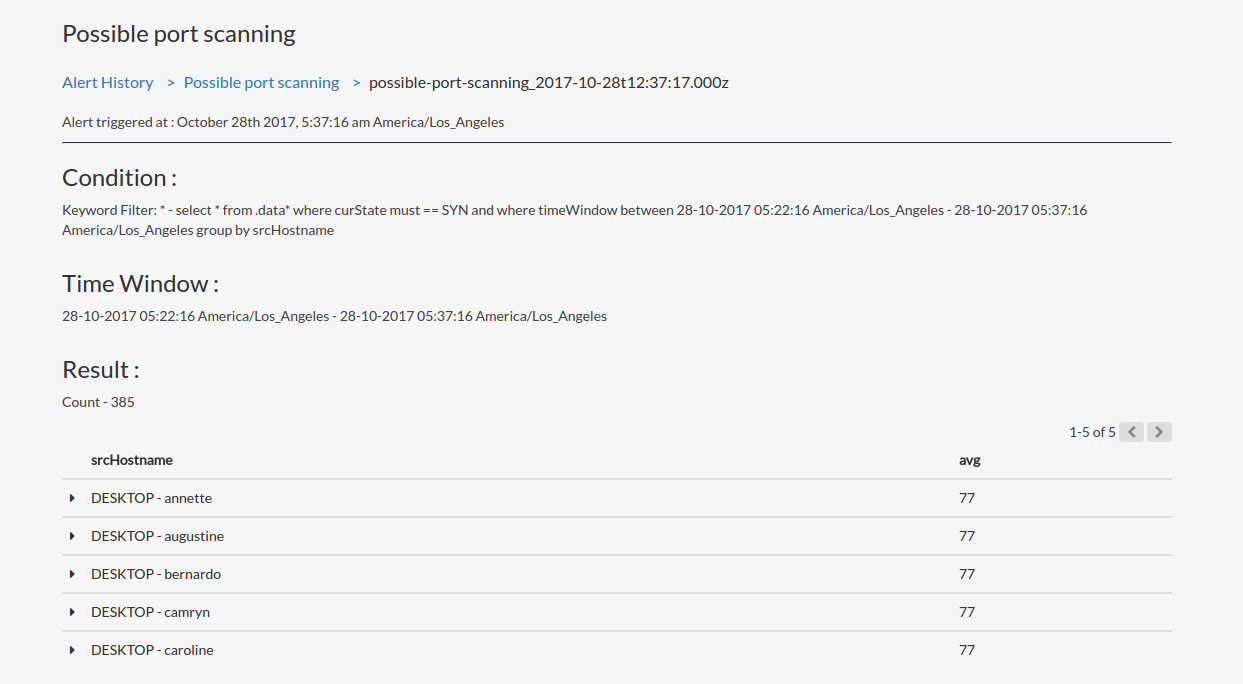
If you want to get notified when something happen in your index, for example, a certain labels is detected or the number of labels reach a certain number, you can use Alerts. It simplifies how you create and manage alert rules for Elasticsearch and it provides a flexible approach to notification (it supports multiple notifications, from Email to Slack and Webhook).
Conclusion
In this post we have seen how to combine the power of Elasticsearch’s search with the powerful machine learning service AWS Rekognition. The process pipeline includes also a S3 bucket (where the images are stored) and a SQS Queue used to receive event notifications when a new image is stored to S3 (and it is ready for the image labels detection task). This use case show you how to use Elasticsearch as a search engine not only for logs.
If you are familiar with AWS Lambda you can replace the SQS Queue and the consumer with a function (S3 notification supports AWS Lambda as destination) and call the AWS rekognition service from your Lambda function. Keep in mind that with Lambda you have a 5 minutes execution limit and you can’t invoce the function on batch on a set of images (so you will pay the Lambda execution for each image).
I ran this demo using the following environment configuration:
- Elasticsearch 5.0.0
- Python 3.4 and Boto3 AWS SDK
- Ubuntu 14.04
A similar (Tensorflow instead of AWS Rekognition) use case has been presented to the Elastic Stack in a Day in Milan, Italy (June 2017), you can find the slides here: Tensorflow and Elasticsearch: Image Recognition.