Streamlining Document Search with AWS Comprehend and Elasticsearch 6.0
How to automatically extract metadata from documents? How to index them and perform fast searches? In this post, we are going to see how to automatically extract metadata from a document using Amazon AWS Comprehend and Elasticsearch 6.0 for fast search and analysis.
This architecture we present improves the search and automatic classification of documents (using the metadata) for your organization.
Using the automatically extracted metadata you can search for documents and find what you need.
We are going to use the following components:
- Amazon S3 bucket and Amazon Simple Queue Service
- AWS Comprehend
- Elasticsearch 6.0
- Elasticsearch Ingest Attachment Processor Plugin
- Elasticsearch Ingest Geoip Processor Plugin
- Kibana
- Skedler Reports
- Skedler Alerts
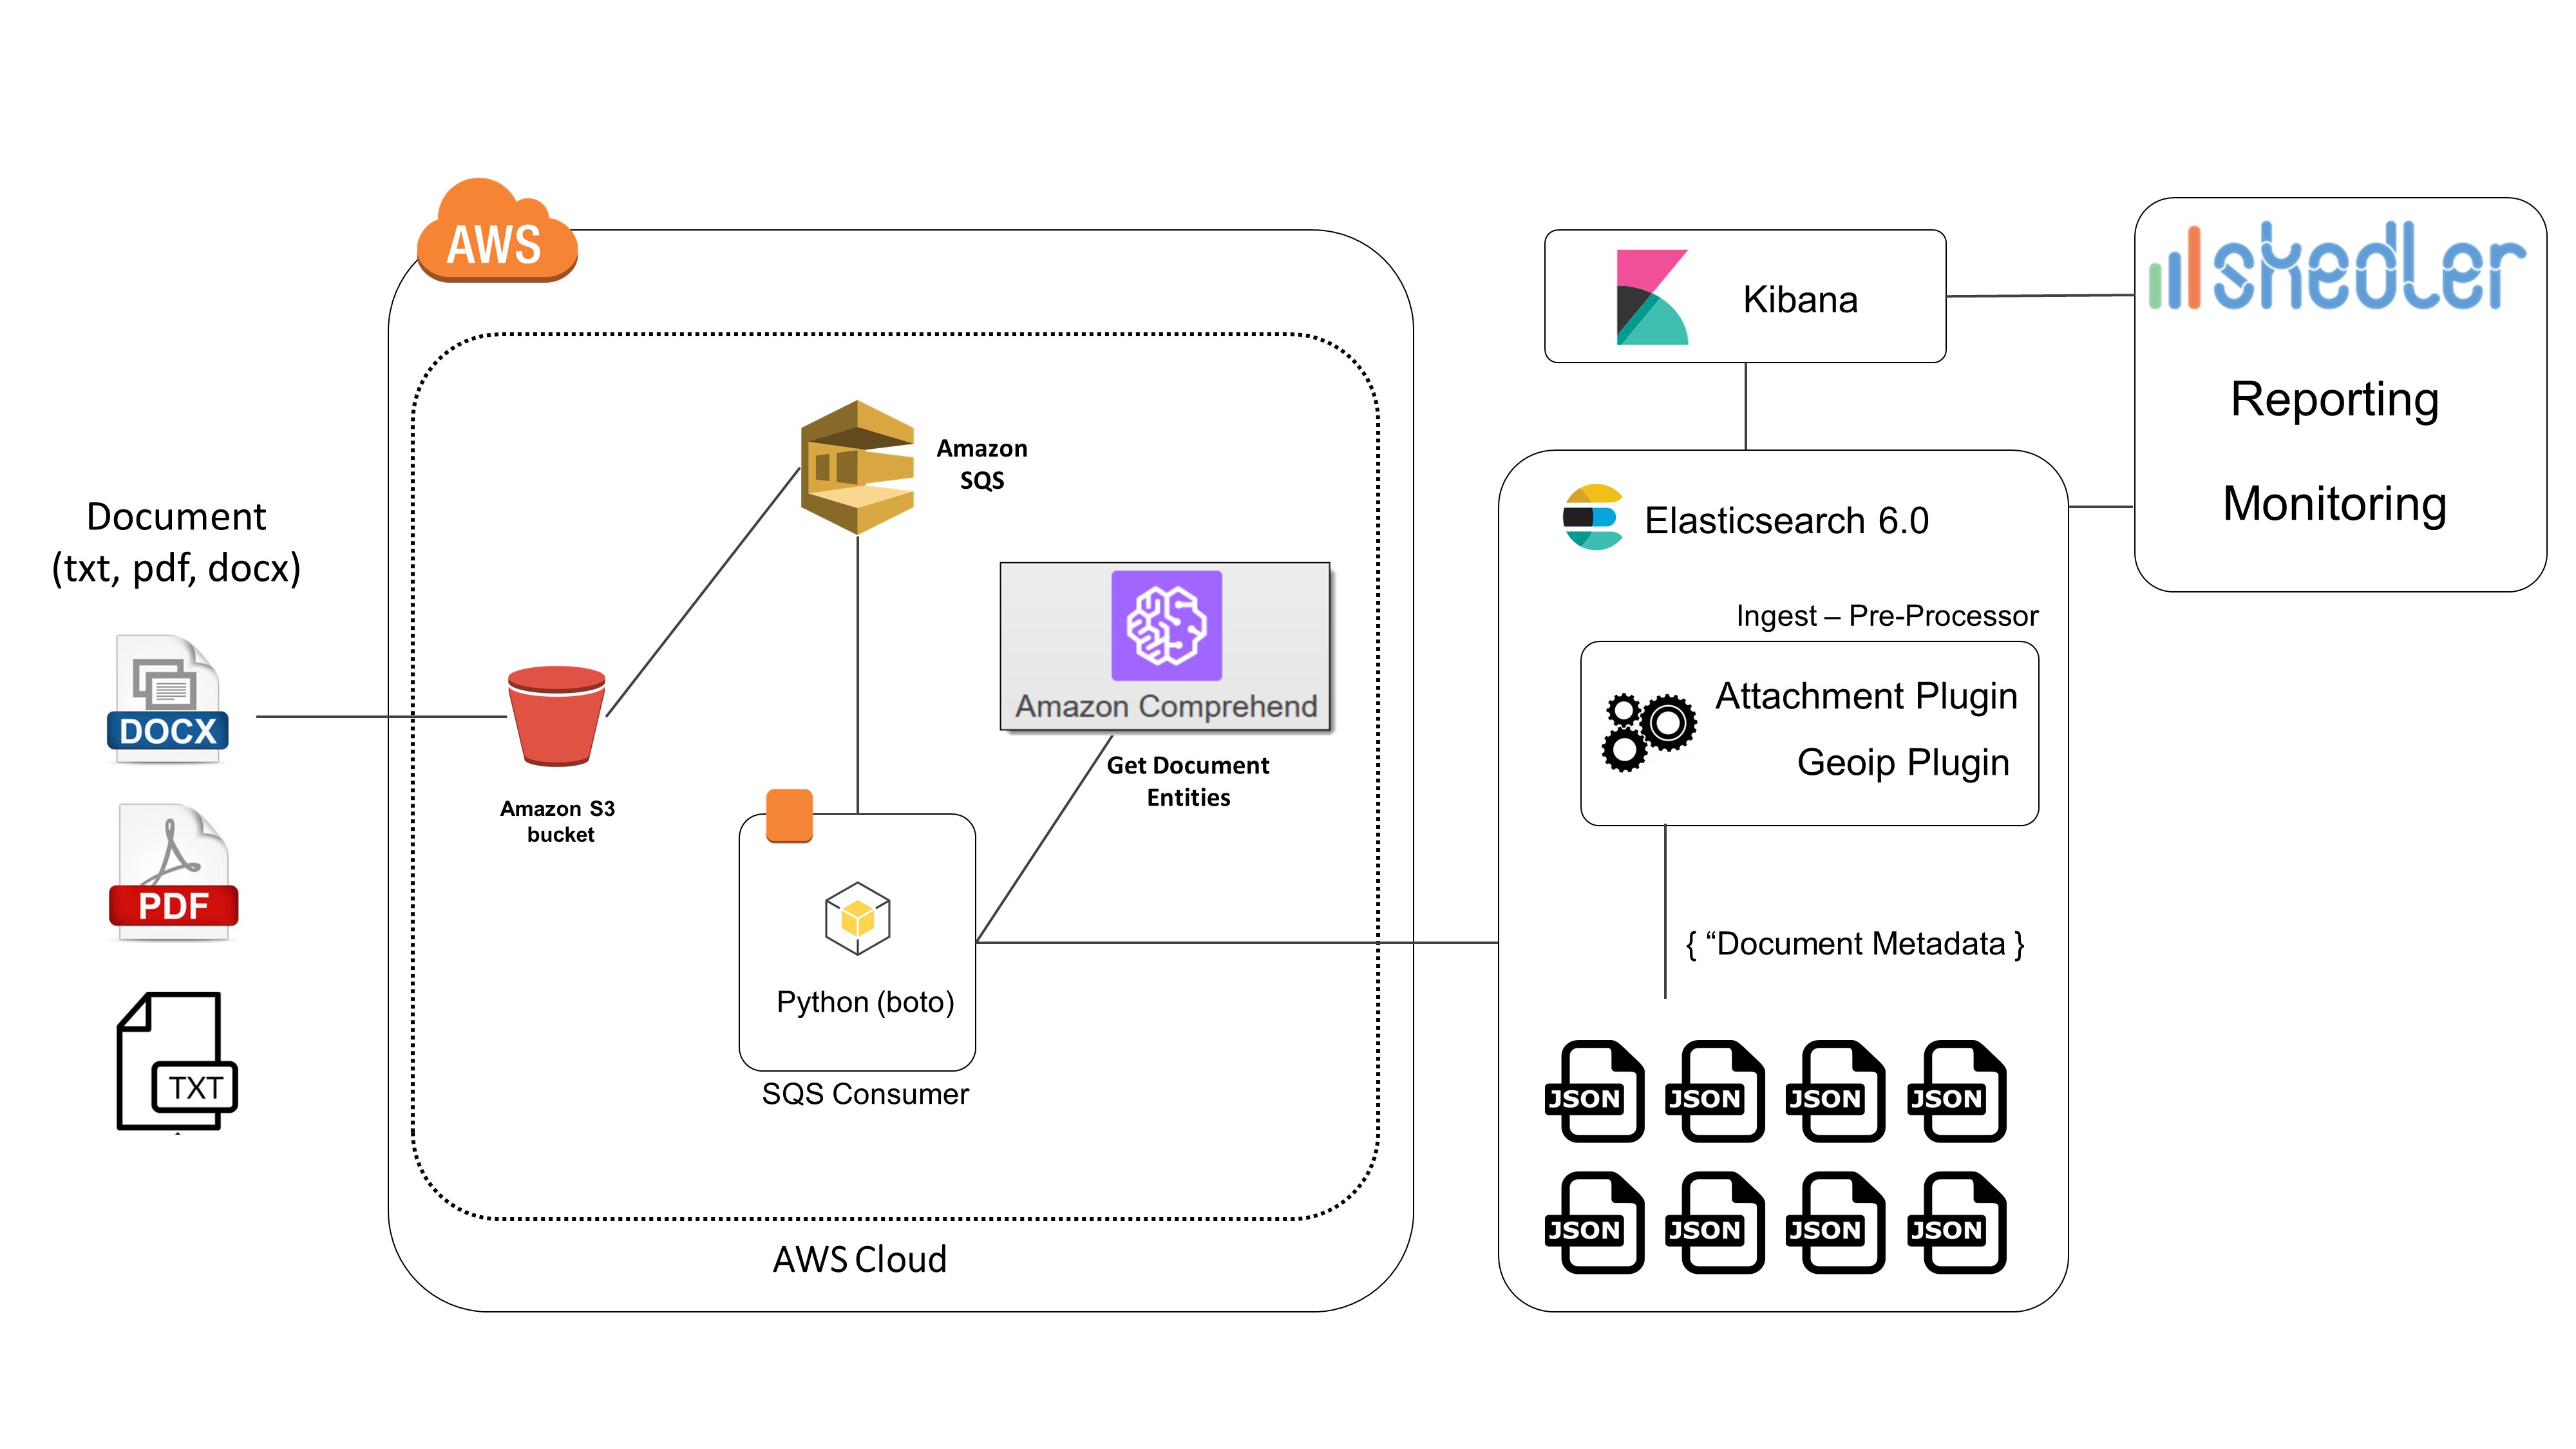
Architecture
Example of applications:
- Voice of customer analytics: You can use Amazon Comprehend to analyze customer interactions in the form of documents, support emails, online comments, etc., and discover what factors drive the most positive and negative experiences. You can then use these insights to improve your products and services.
- Semantic search: You can use Amazon Comprehend to provide a better search experience by enabling your search engine to index key phrases, entities, and sentiment. This enables you to focus the search on the intent and the context of the articles instead of basic keywords.
- Knowledge management and discovery: You can use Amazon Comprehend to organize and categorize your documents by topic for easier discovery, and then personalize content recommendations for readers by recommending other articles related to the same topic.
When we talk about metadata, I like the following definition:
Metadata summarizes basic information about data, which can make finding and working with particular instances of data easier. For example, author, date created and date modified and file size are examples of very basic document metadata. Having the ability to filter through that metadata makes it much easier for someone to locate a specific document.
We are going to focus on the following metadata:
- Document content type (PDF, Plain Text, HTML, Docx)
- Document dominant language
- Document entities
- Key phrases
- Sentiment
- Document length
- Country of origin of the document (metadata taken from the user details – ip address)
Amazon S3 will be the main documents storage. Once a document has been uploaded to S3 (you can easily use the AWS SDK to upload a document to S3 from your application) a notification is sent to an SQS queue and then consumed by a consumer.
The consumer gets the uploaded document and detects the entities/key phrases/sentiment using AWS Comprehend. Then it indexes the document to Elasticsearch. We use the Elasticsearch pre-processor plugins, Attachment Processor and Geoip Processor, to perform the other metadata extraction (more details below).
Here are the main steps performed in the process:
- Upload a document to S3 bucket
- Event notification from S3 to a SQS queue
- Event consumed by a consumer
- Entities/key phrases/sentiment detection using AWS Comprehend
- Index to Elasticsearch
- ES Ingestion pre-processing: extract document metadata using Attachment and Geoip Processor plugin
- Search in Elasticsearch by entities/sentiment/key phrases/language/content type/source country and full-text search
- Use Kibana for dashboard and search
- Use Skedler and Alerts for reporting, monitoring and alerting
In the example, we used AWS S3 as document storage. But you could extend the architecture and use the following:
- SharePoint: create an event receiver and once a document has been uploaded extract the metadata and index it to Elasticsearch. Then search and get the document on SharePoint
- Box, Dropbox and Google Drive: extract the metadata from the document stored in a folder and then easily search for them
- Similar Object storage (i.e. Azure Blob Storage)
Event notification
When a document has been uploaded to the S3 bucket a message will be sent to an Amazon SQS queue. You can read more information on how to configure the S3 Bucket and read the queue programmatically here: Configuring Amazon S3 Event Notifications.
This is how a message notified from S3 looks. The information we need are the sourceIPAddress and object key
{
“Records”: [
{
“eventVersion”: “2.0”,
“eventSource”: “aws:s3”,
“eventName”: “ObjectCreated:Put”,
“requestParameters”: { “sourceIPAddress”: “xxx.xxx.xx.xx” },
“s3”: {
“s3SchemaVersion”: “1.0”,
“configurationId”: “ev”,
“bucket”: {
“name”: “your_bucket”,
“arn”: “arn:aws:s3:::your_bucket”
},
“object”: {
“key”: “my_document.docx”,
“size”: 567,
}
}
}
]
}
Consume messages from Amazon SQS queue
Now that the S3 bucket has been configured, when a document is uploaded to the bucket a notification will be sent to the SQS queue. We are going to build a consumer that will read this message and perform the instances/key phrases/sentiment detection using AWS Comprehend. You can eventually read a set of messages (change the MaxNumberOfMessages parameter) from the queue and run the task against a set of documents (batch processing).
With this code you can read the messages from a SQS queue and fetch the bucket and key (used in S3) of the uploaded document and use them to invoke AWS Comprehend for the metadata detection task:
import boto3 as boto3
import time
import json
import os
AWS_ACCESS_KEY = ‘youAWS_ACCES_KEY’
AWS_SECRET_ACCESS_KEY = ‘youAWS_SECRET_ACCESKEY’
AWS_REGION = ‘yourAWS_SUBSCRIBTION_REGION’
SQS_QUEUE_NAME = ‘SQS_QUEUE_NAME’
sqs_resource_connection = boto3.resource(
‘sqs’,
aws_access_key_id = AWS_ACCESS_KEY,
aws_secret_access_key = AWS_SECRET_ACCESS_KEY,
region_name = AWS_REGION
)
queue = sqs_resource_connection.get_queue_by_name(QueueName = SQS_QUEUE_NAME)
while True:
messages = queue.receive_messages(MaxNumberOfMessages = 1, WaitTimeSeconds = 5)
for message in messages:
body = json.loads(message.body)
filename_key = body[‘Records’][0][‘s3’][‘object’][‘key’]
ip = body[‘Records’][0][‘requestParameters’][‘sourceIPAddress’]
# Here we will run the entities document detection with AWS Comprehend
# and index the result to Elasticsearch
message.delete()
time.sleep(10)
We will download the uploaded document from S3.
import boto3
AWS_ACCESS_KEY = ‘your_key’
AWS_SECRET_ACCESS_KEY =’your_secret_key’
BUCKET_NAME = ‘your bucket’
s3_client_connection = boto3.client(
‘s3’,
aws_access_key_id = AWS_ACCESS_KEY,
aws_secret_access_key = AWS_SECRET_ACCESS_KEY
)
def consume_from_sqs(message):
# Extract uploaded document details
ip = message[‘requestParameters’][‘sourceIPAddress’]
key = message[‘s3’][‘object’][‘key’]
# download the document from S3
local_path = “{}”.format(key)
s3_client_connection.download_file(BUCKET_NAME, key, local_path)
# detect entities
entities = process_document(local_path)
AWS Comprehend
Amazon Comprehend is a new AWS service presented at the re:invent 2017.
Amazon Comprehend is a natural language processing (NLP) service that uses machine learning to find insights and relationships in text. Amazon Comprehend identifies the language of the text; extracts key phrases, places, people, brands, or events; understands how positive or negative the text is, and automatically organizes a collection of text files by topic. – AWS Service Page
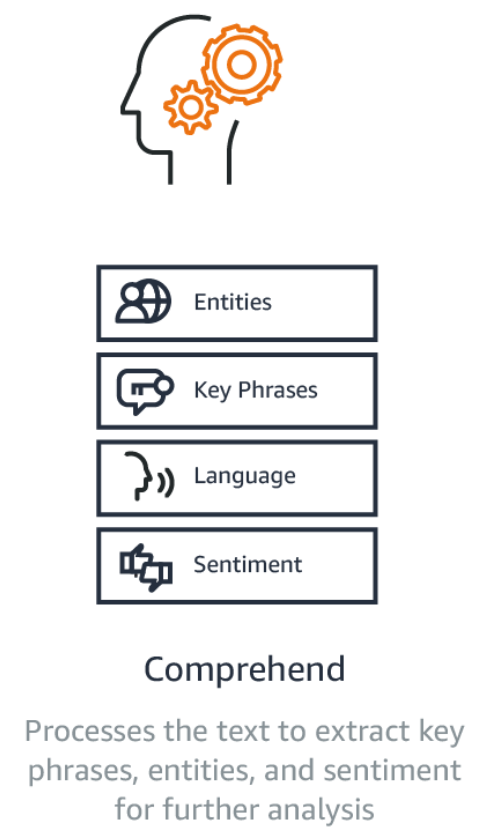
It analyzes text and tells you what it finds, starting with the language, from Afrikaans to Yoruba, with 98 more in between. It can identify different types of entities (people, places, brands, products, and so forth), key phrases, sentiment (positive, negative, mixed, or neutral), and extract key phrases, all from a text in English or Spanish. Finally, Comprehend‘s topic modeling service extracts topics from large sets of documents for analysis or topic-based grouping. – Jeff Barr – Amazon Comprehend – Continuously Trained Natural Language Processing.
Instead of AWS Comprehend you can use similar service to perform Natural Language Processing, like: Google Cloud Platform – Natural Language API or Microsoft Azure – Text Analytics API.
Entities Detection
With this code, we can invoke the entities detection of AWS Comprehend. We will use the object key to download the object from S3.
Once you have downloaded the document, invoke the detect_entities method of AWS Comprehend.
import boto3
import sys
AWS_ACCESS_KEY = ‘your_key’
AWS_SECRET_ACCESS_KEY =’your_secret_key’
BUCKET_NAME = ‘your bucket’
client_comprehend = boto3.client(
‘comprehend’,
region_name = ‘eu-west-1’,
aws_access_key_id = AWS_ACCESS_KEY,
aws_secret_access_key = AWS_SECRET_ACCESS_KEY
)
def process_document(file_path):
filename = file_path.split(“/”)[-1]
extension = filename.split(“.”)[-1]
plain_text = ”
# you can find the methods to extract the text from different document here:
# https://gist.github.com/mz1991/97ee3f7045c8fd0e6f21ab14f9e588c7
if extension == “pdf”:
plain_text = get_pdf_text(file_path)
if extension == “docx”:
plain_text = get_docx_text(file_path)
if extension == “txt” or extension == “csv”:
plain_text = get_txt_text(file_path)
# Add your custom file extension handler
# Max Bytes size supported by AWS Comprehend
# https://boto3.readthedocs.io/en/latest/reference/services/comprehend.html#Comprehend.Client.detect_dominant_language
# https://boto3.readthedocs.io/en/latest/reference/services/comprehend.html#Comprehend.Client.detect_entities
while sys.getsizeof(plain_text) > 5000:
plain_text = plain_text[:-1]
dominant_language_response = client_comprehend.detect_dominant_language(
Text=plain_text
)
dominant_language = sorted(dominant_language_response[‘Languages’], key=lambda k: k[‘LanguageCode’])[0][‘LanguageCode’]
# The service now only supports English and Spanish. In future more languages will be available.
if dominant_language not in [‘en’,’es’]:
dominant_language = ‘en’
response = client_comprehend.detect_entities(
Text=plain_text,
LanguageCode=dominant_language
)
entites = list(set([x[‘Type’] for x in response[‘Entities’]]))
return entites
Key phrases
To extract the key phrases use the detect_key_phrases method of AWS Comprehend.
response_key_phrases = client_comprehend.detect_key_phrases(
Text=plain_text,
LanguageCode=dominant_language
)
key_phrases = list(set([x[‘Text’] for x in response_key_phrases[‘KeyPhrases’]]))
Sentiment
To extract the sentiment (positive, negative, neutral) use the detect_sentiment method of AWS Comprehend.
response_sentiment = client_comprehend.detect_sentiment(
Text=plain_text,
LanguageCode=dominant_language
)
sentiment = response_sentiment[‘Sentiment’]
Index to Elasticsearch
Given a document, we now have a set of metadata that identify it. Next, we index these metadata to Elasticsearch and use a pipeline to extract the other metadata. To do so, I created a new index called library and a new type called document.
Since we are going to use Elasticsearch 6.0 and Kibana 6.0, I suggested you read the following resource:
The document type we are going to create will have the following properties:
- title: the title of the document (s3 key)
- data: the base64 encoding of the document (used from the Attachment plugin to extract metadata)
- ip: field that will contain the ip address of the user that uploaded the document (so we can extract the location details)
- entities: the list of entities detected by AWS Comprehend
- key phrases: the list of key phrases detected by AWS Comprehend
- sentiment: the sentiment of the document detected by AWS Comprehend
- s3Location: link to the document in the S3 bucket
Create a new index:
curl -XPUT ‘esHost:9200/library/’ -H ‘Content-Type: application/json’ -d ‘{
“settings” : {
“index” : {
“number_of_shards” : 1,
“number_of_replicas” : 0
}
}
}’
Create a new mapping. As you may notice, in ES 6.0, the type string has been replaced by the type text and keyword. String type ES 6.0
curl -X PUT “esHost:9200/library/document/_mapping” -H ‘Content-Type: application/json’ -d ‘{
“document” : {
“properties” : {
“title” : { “type” : “text”},
“data” : { “type” : “binary”, “doc_values”: false, “store”: false },
“ip” : { “type” : “keyword” },
“entities” : { “type” : “text” },
“keyPhrases” : { “type” : “text” },
“sentiment” : { “type” : “text” },
“s3Location” : { “type” : “text”}
}
}
}’
To pre-process documents before indexing it, we define a pipeline that specifies a series of processors. Each processor transforms the document in some way. For example, you may have a pipeline that consists of one processor that removes a field from the document followed by another processor that renames a field. Our pipeline will extract the document metadata (from the encoded base64) and the location information from the ip address.
The attachment processors use the Ingest Attachment plugin and the geoip processor use the Ingest Geoip plugin.
curl -X PUT ‘esHost:9200/_ingest/pipeline/documentpipeline’ -H ‘Content-Type: application/json’ -d ‘
{
“description” : “Pipeline description”,
“processors” : [
{
“attachment” : {
“field” : “data”,
“properties”: [“content”, “content_type”, “language”, “content_length”]
}
},
{
“geoip” : {
“field” : “ip”
}
}
]
}’
Read more about ingestion and pipeline here: Ingest Node, Pipeline Definition.
If you want, you can write your custom pre-processor and invoke AWS Comprehend in the ingestion phase: Writing Your Own Ingest Processor for Elasticsearch.
We can now index a new document:
from elasticsearch import Elasticsearch
import base64
es_client = Elasticsearch(‘esHost’)
def create_es_document(title, base64data, ip, entites, key_phrases, sentiment, s3_location):
return {
“title” : title,
“data” : base64data.decode(“utf-8”),
“ip” : ip,
“entities”: entites,
“keyPhrases”: key_phrases,
“sentiment”: sentiment,
“s3Location”: s3_location
}
base64data = base64.b64encode(open(‘your_file’,”rb”).read())
document = create_es_document(‘the title of the document’, base64data, ‘xxx.xxx.xx.xx’, [‘entity1’, ‘entity2’], [‘k1′,’k2’], ‘positive’ ‘https://your_bucket.s3.amazonaws.com/your_object_key’]
es_client.index(index=’library’, doc_type=’document’, body=document, pipeline=’documentpipeline’) # note the pipeline here
This is how an indexed document looks like. Notice the attachment and geoip section. We have the language, content type, length and user location details.
{
“_index”: “library”,
“_type”: “document”,
“_id”: “o_lllsFmAtreId4Ib84”,
“_score”: 1,
“_source”: {
“geoip”: {
“continent_name”: “North America”,
“city_name”: “Ottawa”,
“country_iso_code”: “CA”,
“region_name”: “Ontario”,
“location”: {
“lon”: -75.8265,
“lat”: 45.3433
}
},
“data”: “UEsDBBQABgAIAA…..”
“attachment”: {
“content_type”: “application/vnd.openxmlformats-officedocument.wordprocessingml.document”,
“language”: “en”,
“content”: “file content”,
“content_length”: 120400
},
“entities”: [
“Organization”,
“Location”,
“Date”
],
“keyPhrases”: [
“k1”,
“k2”
],
“sentiment”: “positive”,
“ip”: “xx.xxx.xx.xxx”,
“s3Location”: “https://your_bucket.s3.amazonaws.com/A Christmas Carol, by Charles Dickens.docx”,
“title”: “A Christmas Carol, by Charles Dickens.docx”
}
}
Visualize, Report, and Monitor
With Kibana you can create a set of visualizations/dashboards to search for documents by entities and to monitor index metrics (like number of document by language, most contributing countries, document by content type and so on).
Using Skedler, an easy to use report scheduling and distribution application for Elasticsearch-Kibana-Grafana, you can centrally schedule and distribute custom reports from Kibana Dashboards and Saved Searches as hourly/daily/weekly/monthly PDF, XLS or PNG reports to various stakeholders. If you want to read more about it: Skedler Overview.
Example of Kibana dashboard:
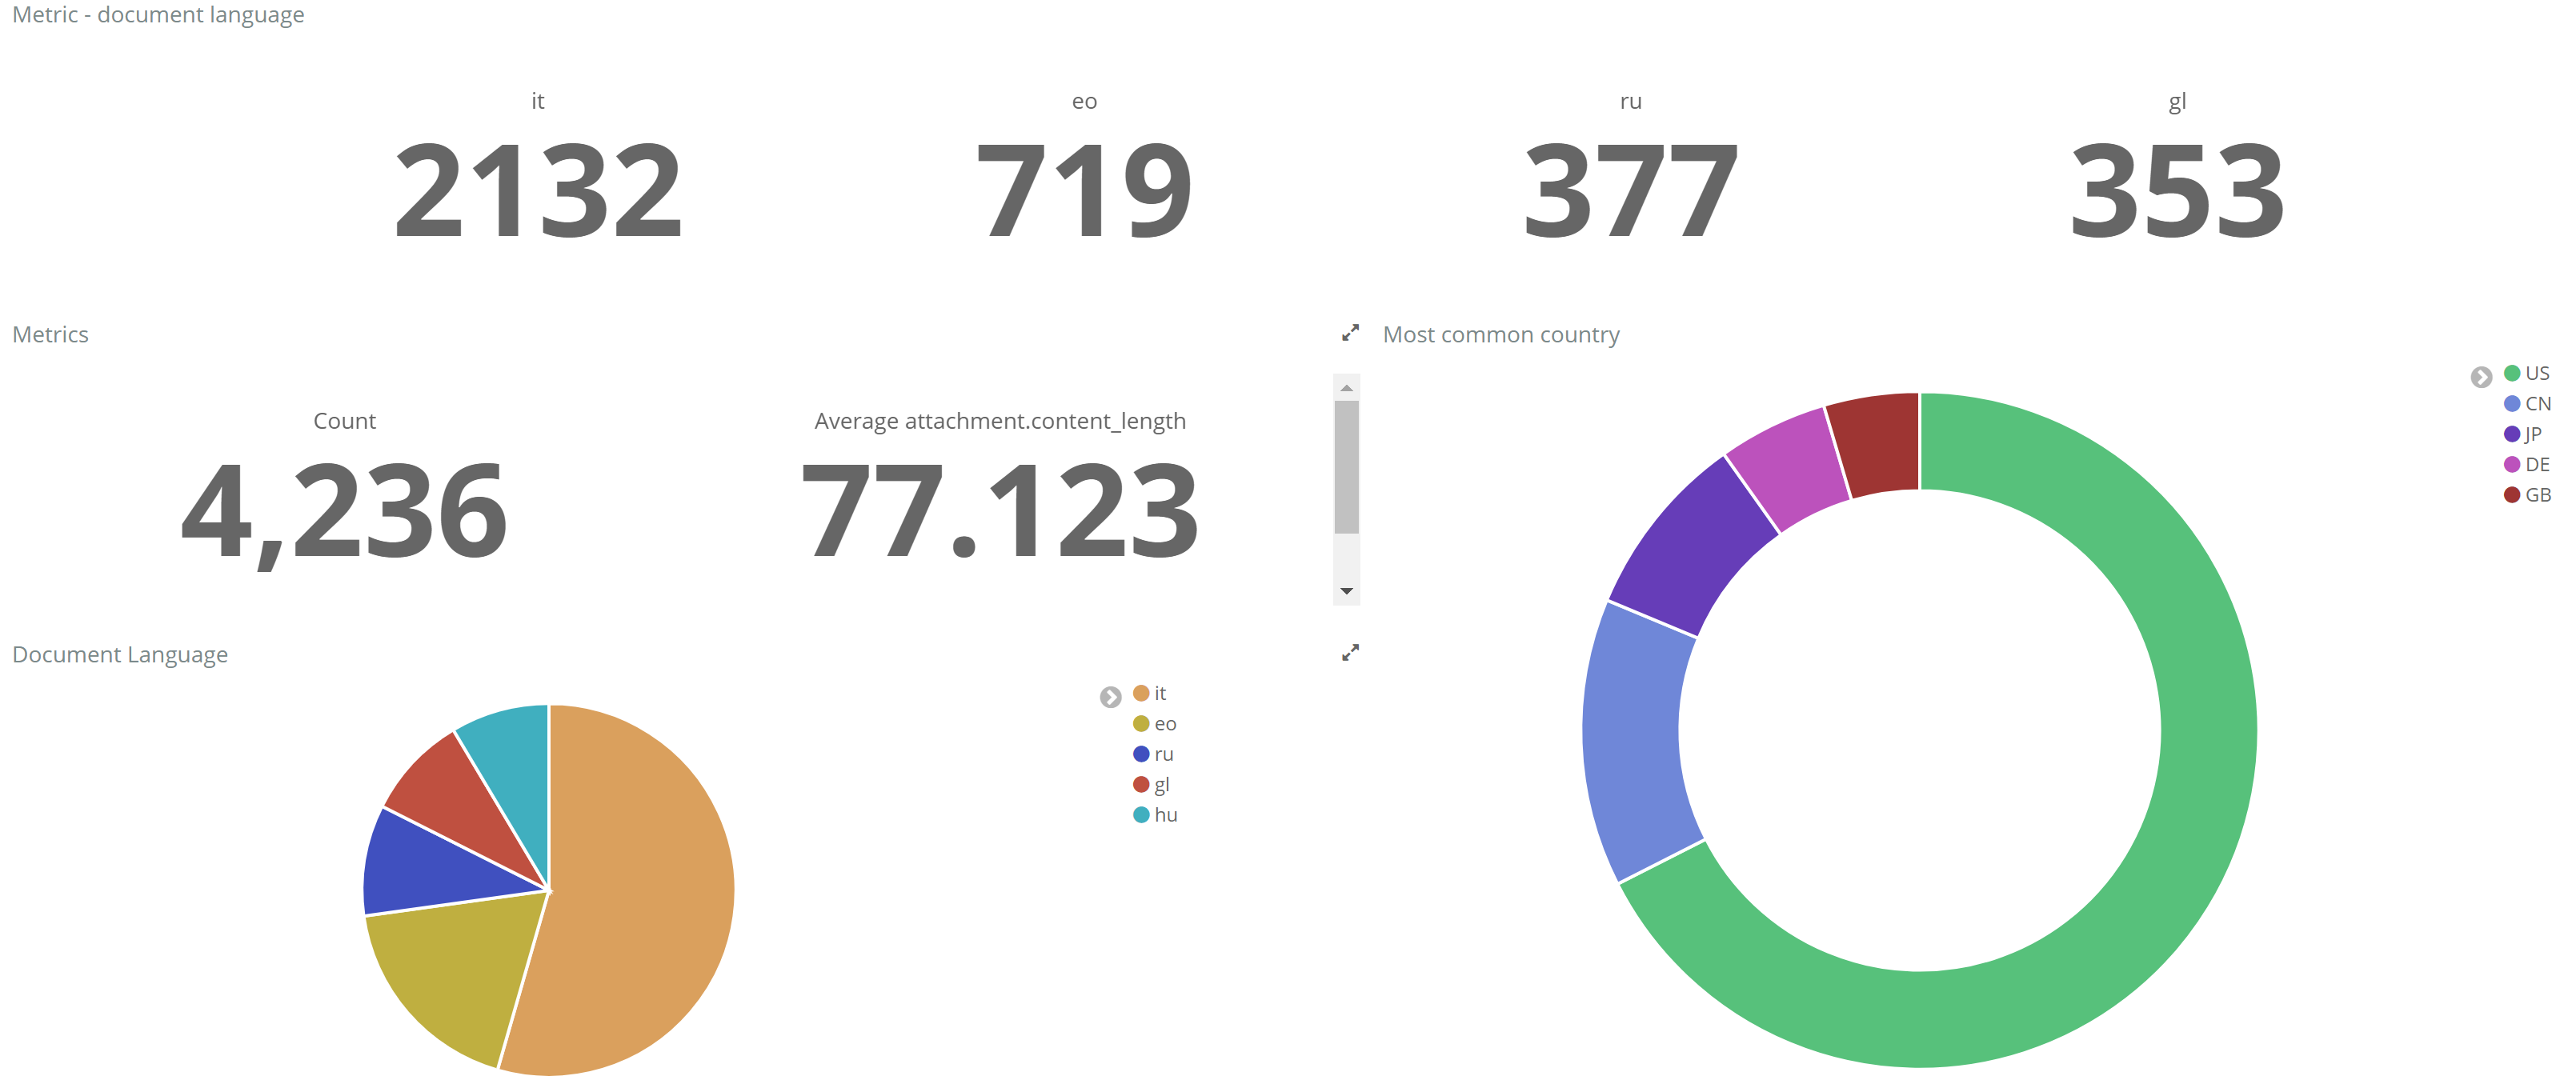
Number of documents by language and countries that upload more documents.
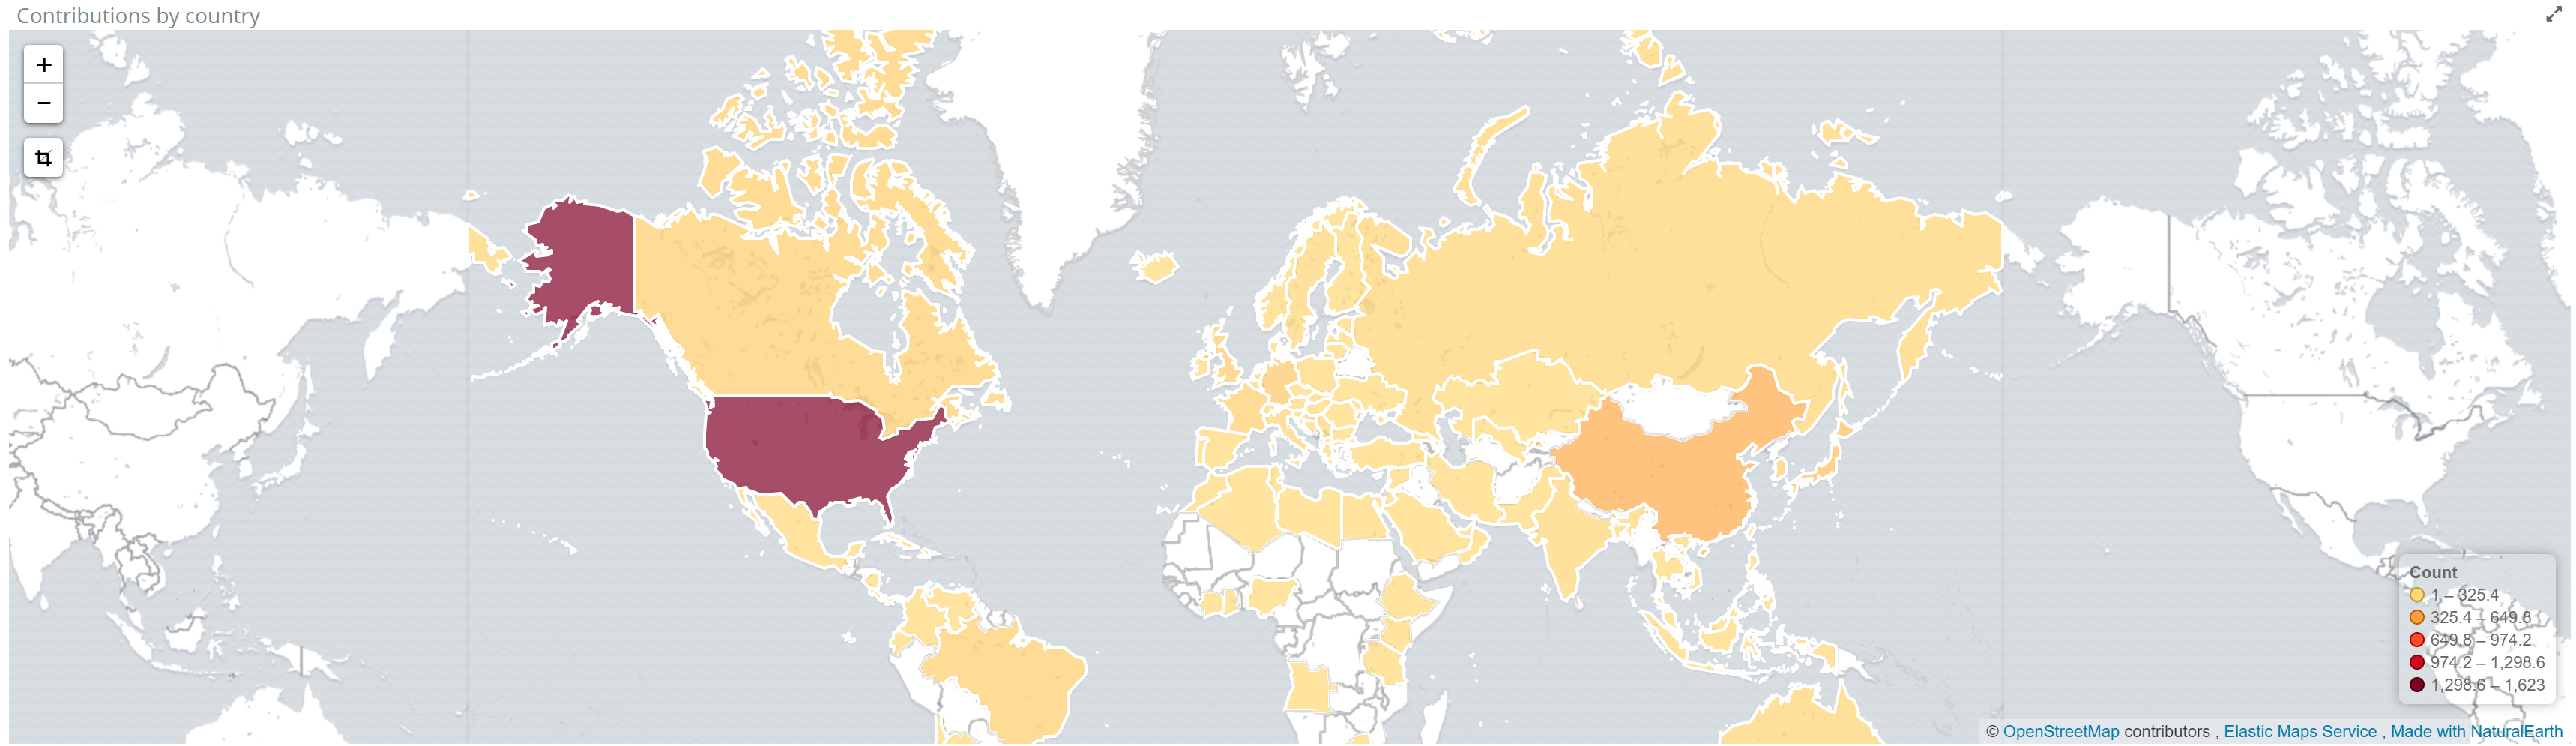
Countries by the number of uploaded documents.
If you want to get notified when something happens in your index, for example, a certain entity is detected or the number of documents by country or documents by language reaches a certain value, you can use Alerts. It simplifies how you create and manage alert rules for Elasticsearch and it provides a flexible approach to notification (it supports multiple notifications, from Email to Slack and Webhook).
Conclusion
In this post we have seen how to use Elasticsearch as the search engine for documents metadata. You can extend your system by adding this pipeline to automatically extract the document metadata and index them to Elasticsearch for fast search (semantic search).
By automatically extracting the metadata from your documents you can easily classify and search (Knowledge management and discovery) for them by content, entities, content type, dominant content language and source country (from where the document has been uploaded).
I ran this demo using the following environment configurations:
- Elasticsearch and Kibana 6.0.0
- Python 3.4 and AWS SDK Boto3 1.4.8
- Ubuntu 14.04
- Skedler Reports and Alerts