Extract Business Insights from Audio Using AWS Transcribe, AWS Comprehend & ELK
In the previous post, we presented a system architecture to convert audio and voice into written text with AWS Transcribe, extract useful information for quick understanding of content with AWS Comprehend, index this information in Elasticsearch 6.2 for fast search and visualize the data with Kibana 6.2.
In this post we are going to see how to implement the previosly described architecture.
The main steps performed in the process are:
- Configure S3 Event Notification
- Consume messages from Amazon SQS queue
- Convert the recording to text with AWS Transcribe
- Entities/key phrases/sentiment detection using AWS Comprehend
- Index to Elasticsearch 6.2
- Search in Elasticsearch by entities/sentiment/key phrases/customer
- Visualize, report and monitor with Kibana dashboards
- Use Skedler and Alerts for reporting, monitoring and alerting
1. Configure S3 Event Notification
When a new recording has been uploaded to the S3 bucket, a message will be sent to an Amazon SQS queue.
You can read more information on how to configure the S3 Bucket and read the queue programmatically here: Configuring Amazon S3 Event Notifications.
This is how a message notified from S3 looks. The information we need are the object key and bucket name.
{
“Records”: [
{
“eventVersion”: “2.0”,
“eventSource”: “aws:s3”,
“eventName”: “ObjectCreated:Put”,
“requestParameters”: { “sourceIPAddress”: “xxx.xxx.xx.xx” },
“s3”: {
“s3SchemaVersion”: “1.0”,
“configurationId”: “ev”,
“bucket”: {
“name”: “your_bucket”,
“arn”: “arn:aws:s3:::your_bucket”
},
“object”: {
“key”: “my_new_recording.mp3”,
“size”: 567,
}
}
}
]
}
2. Consume messages from Amazon SQS queue
Now that the S3 bucket has been configured, a notification will be sent to the SQS queue when a recording is uploaded to the bucket. We are going to build a consumer that will perform the following operations:
- Start a new AWS Transcribe transcription job
- Check the status of the job
- When the job is done, perform text analysis with AWS Comprehend
- Index the results to Elasticsearch
With this code you can read the messages from a SQS queue, fetch the bucket and key (used in S3) of the uploaded document and use them to invoke AWS Transcribe for the speech to text task:
import boto3 as boto3
import time
import json
AWS_ACCESS_KEY = ‘youAWS_ACCES_KEY’
AWS_SECRET_ACCESS_KEY = ‘youAWS_SECRET_ACCESKEY’
AWS_REGION = ‘yourAWS_SUBSCRIBTION_REGION’
SQS_QUEUE_NAME = ‘SQS_QUEUE_NAME’
sqs_resource_connection = boto3.resource(
‘sqs’,
aws_access_key_id = AWS_ACCESS_KEY,
aws_secret_access_key = AWS_SECRET_ACCESS_KEY,
region_name = AWS_REGION
)
queue = sqs_resource_connection.get_queue_by_name(QueueName = SQS_QUEUE_NAME)
while True:
messages = queue.receive_messages(MaxNumberOfMessages = 1, WaitTimeSeconds = 5)
for message in messages:
body = json.loads(message.body)
key_name = body[‘Records’][0][‘s3’][‘object’][‘key’]
bucket_name= body[‘Records’][0][‘bucket’][‘name’]
object_url = f’https://s3.amazonaws.com/{bucket_name}/{key_name}’
# Start the AWS Transcribe transcription job
# Check job status
# Run text analysis
# Index to Elasticsearch
message.delete()
time.sleep(10)
3. AWS Transcribe – Start Transcription Job
Once we have consumed a S3 message and we have the url of the new uploaded document, we can start a new transcription job (asynchronous) to perform the speech to text task.
We are going to use the start_transcription_job method.
It takes a job name, the S3 url and the media format as parameters.
To use the AWS Transcribe API be sure that your AWS Python SDK – Boto3 is updated.
pip install boto3 –upgrade
import boto3
client_transcribe = boto3.client(
‘transcribe’,
region_name=’us-east-1′ # service still in preview
)
def start_transcribe_job(job_name, media_file_uri):
response = client_transcribe.start_transcription_job(
TranscriptionJobName=job_name,
LanguageCode=’en-US’, # TODO: use parameter when more languages will be available
MediaFormat=’mp3′, # feel free to change it
Media={
‘MediaFileUri’: media_file_uri
}
)
return response[‘TranscriptionJob’][‘TranscriptionJobName’]
Read more details here: Python Boto3 AWS Transcribe.
3a. AWS Transcribe – Check Job Status
Due to the asynchronous nature of the transcription job (it could take a while depending on the length and complexity of your recordings), we need to check the job status.
Once the stauts is “COMPLETED” we can retrieve the result of the job (the text converted from the recording).
def get_transcribe_job_response(job_name):
job_status = ‘IN_PROGRESS’
while job_status == ‘IN_PROGRESS’:
job = client_transcribe.get_transcription_job(
TranscriptionJobName=job_name
)
job_status = job[‘TranscriptionJob’][‘TranscriptionJobStatus’]
time.sleep(5)
if job_status == ‘FAILED’:
raise Exception(f’Job {job_name} failed’)
elif job_status == ‘COMPLETED’:
job_result = job[‘TranscriptionJob’][‘Transcript’][‘TranscriptFileUri’]
with urllib.request.urlopen(job_result) as url:
return json.loads(url.read().decode())[‘results’][‘transcripts’][0]
Here’s how the output looks:
{
“jobName”: “myFirstJob”,
“accountId”: “1111111”,
“results”: {
“transcripts”: [{
“transcript”: “welcome back”
}],
“items”: [{
“start_time”: “0.990”,
“end_time”: “1.300”,
“alternatives”: [{
“confidence”: “0.9999”,
“content”: “welcome”
}],
“type”: “pronunciation”
}, {
“start_time”: “1.300”,
“end_time”: “1.440”,
“alternatives”: [{
“confidence”: “1.0000”,
“content”: “back”
}],
“type”: “pronunciation”
}]
}
}
4. AWS Comprehend – Text Analysis
We have converted our recording to text. Now, we can run the text analysis using AWS Comprehend. The analysis will extract the following elements from the text:
- Sentiment
- Entities
- Key phreses
import boto3
client_comprehend = boto3.client(
‘comprehend’,
region_name = ‘yourRegion’
)
def comprehend_analysis(plain_text):
# Max Bytes size supported by AWS Comprehend
# https://boto3.readthedocs.io/en/latest/reference/services/comprehend.html#Comprehend.Client.detect_dominant_language
# https://boto3.readthedocs.io/en/latest/reference/services/comprehend.html#Comprehend.Client.detect_entities
while sys.getsizeof(plain_text) > 5000:
plain_text = plain_text[:-1]
dominant_language_response = client_comprehend.detect_dominant_language(
Text=plain_text
)
dominant_language = sorted(dominant_language_response[‘Languages’], key=lambda k: k[‘LanguageCode’])[0][‘LanguageCode’]
if dominant_language not in [‘en’,’es’]:
dominant_language = ‘en’
response_entities = client_comprehend.detect_entities(
Text=plain_text,
LanguageCode=dominant_language
)
response_key_phrases = client_comprehend.detect_key_phrases(
Text=plain_text,
LanguageCode=dominant_language
)
response_sentiment = client_comprehend.detect_sentiment(
Text=plain_text,
LanguageCode=dominant_language
)
entites = list(set([x[‘Type’] for x in response_entities[‘Entities’]]))
key_phrases = list(set([x[‘Text’] for x in response_key_phrases[‘KeyPhrases’]]))
sentiment = response_sentiment[‘Sentiment’]
return entites, key_phrases, sentiment
Read more details here: Python Boto3 AWS Comprehend.
5. Index to Elasticsearch
Given a recording, we now have a set of elements that characterize it. Now, we want to index this information to Elasticsearch 6.2. I created a new index called audioarchive and a new type called recording.
The recording type we are going to create will have the following properties:
- customer id: the id of the customer who submitted the recording (substring of the s3 key)
- entities: the list of entities detected by AWS Comprehend
- key phrases: the list of key phrases detected by AWS Comprehend
- sentiment: the sentiment of the document detected by AWS Comprehend
- s3Location: link to the document in the S3 bucket
Create the new index:
curl -XPUT ‘esHost:9200/audioarchive/’ -H ‘Content-Type: application/json’ -d ‘{
“settings” : {
“index” : {
“number_of_shards” : 1,
“number_of_replicas” : 0
}
}
}’
Add the new mapping:
curl -X PUT “esHost:9200/audioarchive/recording/_mapping” -H ‘Content-Type: application/json’ -d ‘{
“recording” : {
“properties” : {
“customerId” : { “type” : “keyword” },
“entities” : { “type” : “keyword” },
“keyPhrases” : { “type” : “keyword” },
“sentiment” : {“type” : “keyword”},
“s3Location” : { “type” : “text”}
}
}
}’
We can now index the new document:
from elasticsearch import Elasticsearch
es_client = Elasticsearch(‘esHost’)
def create_es_document(customer_id, entites, sentiment, key_phrases, s3_location):
return {
“customerId”: customer_id,
“entities”: entites,
“sentiment”: sentiment,
“keyPhrases”: key_phrases,
“s3Location”: s3_location
}
def index_to_es(document, index_name, type):
es_client.index(index=index_name, doc_type=type, body=document)
doc = create_es_document(1, [‘entity1’, ‘entity2’], ‘positive’, [‘k1′,’k2’], ‘https://your_bucket.s3.amazonaws.com/your_object_key’
index_to_es(doc, INDEX_NAME, TYPE_NAME)
6. Search in Elasticsearch by entities, sentiment, key phrases or customer
Now that we indexed the data in Elasticsearch, we can perform some queries to extract business insights from the recordings.
Examples:
Number of positive recordins that contains the _feedback_ key phrases by customer.
POST audioarchive/recording/_search?size=0
{
“aggs”: {
“genres”: {
“terms”: {
“field”: “customerId”
}
}
},
“query”: {
“bool”: {
“must”: [
{
“match”: {
“sentiment”: “Positive”
}
},
{
“match”: {
“keyPhrases”: “feedback”
}
}
]
}
}
}
Number of recordings by sentiment.
POST audioarchive/recording/_search?size=0
{
“aggs”: {
“genres”: {
“terms”: {
“field”: “sentiment”
}
}
}
}
What are the main key phares in the nevative recordings?
POST audioarchive/recording/_search?size=0
{
“aggs”: {
“genres”: {
“terms”: {
“field”: “keyPhrases”
}
}
},
“query”: {
“bool”: {
“should”: [
{
“match”: {
“sentiment”: “Negative”
}
},
{
“match”: {
“sentiment”: “Mixed”
}
}
]
}
}
}
7. Visualize, Report, and Monitor with Kibana dashboards and search
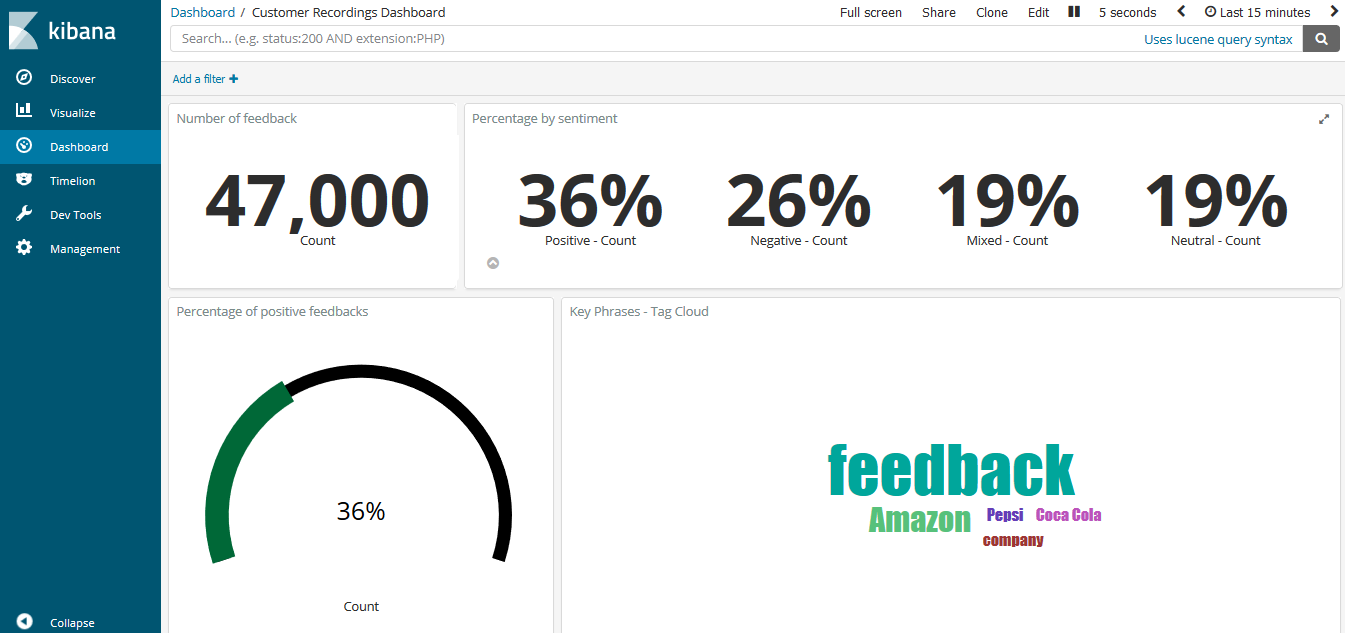
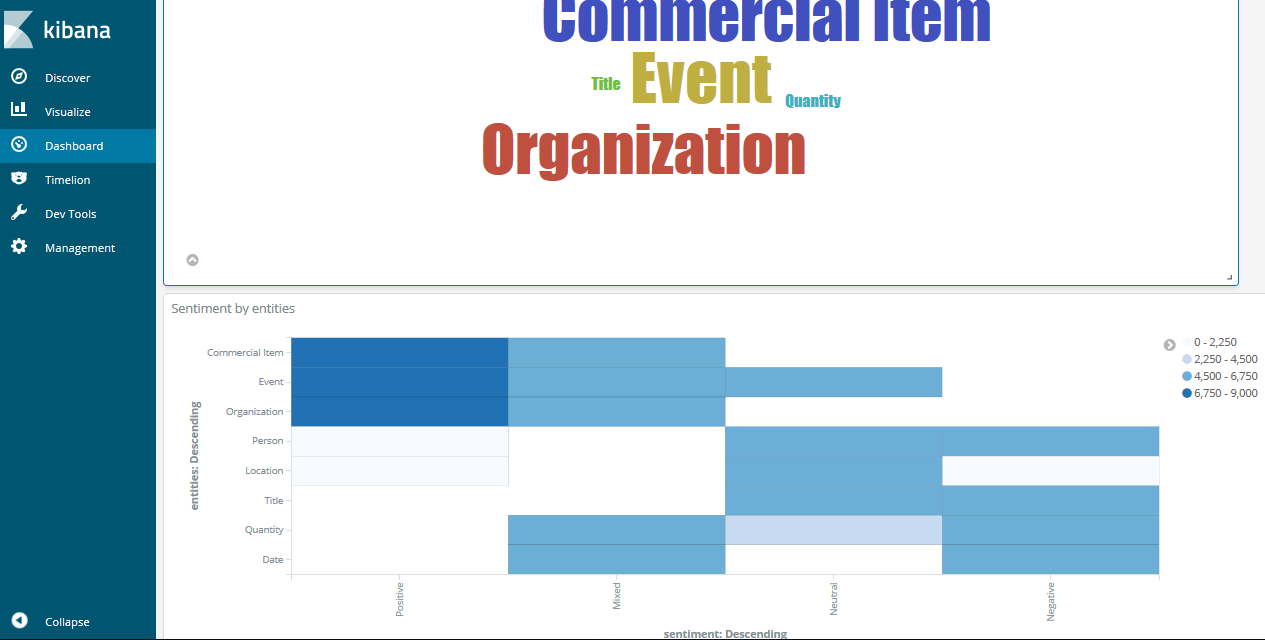
With Kibana you can create a set of visualizations/dashboards to search for recording by customer, entities and to monitor index metrics (like number of positive recordings, number of recordings by customer, most common entities/key phreases in the recordings).
Examples of Kibana dashboards:
Percentage of documents by sentiment, percentage of positive feedback and key phrases:
Number of recordings by customers, and sentiment by customers:

Most common entities and heat map sentiment-entities:
8. Use Skedler Reports and Alerts to easily monitor data
Using Skedler, an easy to use report scheduling and distribution application for Elasticsearch-Kibana-Grafana, you can centrally schedule and distribute custom reports from Kibana Dashboards and Saved Searches as hourly/daily/weekly/monthly PDF, XLS or PNG reports to various stakeholders. If you want to read more about it: Skedler Overview.
[video_embed video=”APEOKhsgIbo” parameters=”” mp4=”” ogv=”” placeholder=”” width=”700″ height=”400″]
If you want to get notified when something happens in your index, for example, a certain entity is detected or the number of negative recording by customer reaches a certain value, you can use Skedler Alerts. It simplifies how you create and manage alert rules for Elasticsearch and it provides a flexible approach to notification (it supports multiple notifications, from Email to Slack and Webhook).
Conclusion
In this post we have seen how to use Elasticsearch as the search engine for customer recordings. We used the speech to text power of AWS Transcribe to convert our recording to text and then AWS Comprehend to extract semantic information from the text. Then we used Kibana to aggregate the data and create useful visualizations and dashboards. Then scheduled and distribute custom reports from Kibana Dashboards using Skedler Reports.
Environment configurations:
- Elasticsearch and Kibana 6.2
- Python 3.6.3 and AWS SDK Boto3 1.6.3
- Ubuntu 16.04.3 LTS
- Skedler Reports & Alerts